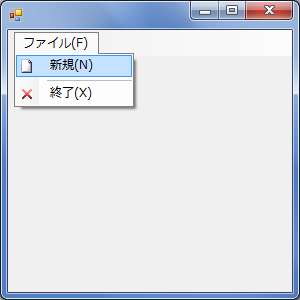
メニュー (TS 版)
メインメニュー
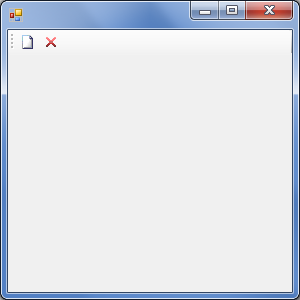
作例:メニュー (ツールストリップ版)

コード
using System;
using System.Drawing;
using System.Windows.Forms;

class Program
{
    [STAThread]
    static void Main()
    {
        Application.EnableVisualStyles();
        Application.Run(new Form1());
    }
}

class Form1 : Form
{
    MenuStrip menuStrip;

    public Form1()
    {
        //
        // tsmiNew
        //
        ToolStripMenuItem tsmiNew = new ToolStripMenuItem("新規(&N)");
        tsmiNew.Click += new EventHandler(tsmiNew_Click);
        tsmiNew.ShortcutKeys =  Keys.Control | Keys.N;
        //
        // tsmiExit
        //
        ToolStripMenuItem tsmiExit = new ToolStripMenuItem("終了(&X)");
        tsmiExit.Click += new EventHandler(tsmiExit_Click);
        tsmiExit.ShortcutKeys = Keys.Alt | Keys.F4;
        //
        // tsmiFile
        //
        ToolStripMenuItem tsmiFile = new ToolStripMenuItem("ファイル(&F)");
        tsmiFile.DropDownItems.AddRange(new ToolStripItem[]
        {
            tsmiNew, new ToolStripSeparator(), tsmiExit
        });
        //
        // menuStrip
        //
        menuStrip = new MenuStrip();
        menuStrip.Items.AddRange(new ToolStripItem[]
        {
            tsmiFile
        });
        //
        // Form1
        //
        this.Controls.Add(menuStrip);
        this.MainMenuStrip = menuStrip;
    }

    void tsmiNew_Click(object sender, EventArgs e)
    {
        new Form1().Show();
    }

    void tsmiExit_Click(object sender, EventArgs e)
    {
        this.Close();
    }
}
解説
ツールストリップ版のメニューは,一種のコントロールとしての扱いとなります。
従来のものより高級なメニューが利用できます。
ツールストリップ版のメニューを設置するには,メニュー項目を収めるための MenuStrip クラスと,各メニュー項目を表す ToolStripMenuItem クラスを利用します。
階層構造はこのようになります。
- Form
- MenuStrip
- ToolStripMenuItem (tsmiFile)
- ToolStripMenuItem (tsmiNew, tsmiExit)
[ファイル(F)] は親になるメニュー項目,[新規(N)] などは子になるメニュー項目ですが,いずれも ToolStripMenuItem を使って表します。
子になるメニュー項目には,イベントハンドラを設定しておきましょう。
親になるメニュー項目には,子になるメニュー項目を追加しておきましょう。
System.Windows.Forms 名前空間
ToolStripMenuItem クラス
[MSDN]
メニュー項目を表現します。
プロパティ
| 項目 | 説明 |
|---|---|
| string Text | テキスト |
| Keys ShortcutKeys | ショートカット |
イベント
| 項目 | 説明 |
|---|---|
| EventHandler Click | クリック |
メソッド
| 項目 | 説明 |
|---|---|
| DropDownItems.Add | メニュー項目の追加 |
| DropDownItems.AddRange | 複数のメニュー項目の追加 |
ToolStripMenuItem コンストラクタ
ToolStripMenuItem()
ToolStripMenuItem(
    string text
)
ToolStripMenuItem(
    string text,
    Image image
)
ToolStripMenuItem(
    string text,
    Image image,
    EventHandler onClick
)
ToolStripMenuItem(
    string text,
    Image image,
    EventHandler onClick,
    Keys shortcutKeys
)
ツールストリップ版のメニューにおいてショートカットを割り当てるには,ToolStripMenuItem に対して ShortcutKeys プロパティを設定します。
ショートカットキーの組合せは Keys 列挙体により表します。
Keys 列挙体については 4.5 節 を参照してください。
メニュー項目間に境界線を設けたいときには,ToolStripSeparator を利用します。
System.Windows.Forms 名前空間
ToolStripSeparator クラス
[MSDN]
メニュー項目の境界を表現します。
親メニュー項目は,MenuStrip に所属させます。
System.Windows.Forms 名前空間
MenuStrip クラス
[MSDN]
メニューを表現します。
メソッド
| 項目 | 説明 |
|---|---|
| Items.Add | メニュー項目の追加 |
| Items.AddRange | 複数のメニュー項目の追加 |
MenuStrip はコントロールの一種なので,Controls.Add メソッドでフォームに追加します。
更に,MenuStrip をフォームの MainMenuStrip プロパティに設定して,メニューの設置は完了です。
アイコン付メニュー
作例:アイコン付メニュー (ツールストリップ版)
コード
using System;
using System.Drawing;
using System.Windows.Forms;

class Program
{
    [STAThread]
    static void Main()
    {
        Application.EnableVisualStyles();
        Application.Run(new Form1());
    }
}

class Form1 : Form
{
    MenuStrip menuStrip;

    public Form1()
    {
        //
        // imageList
        //
        ImageList imageList = new ImageList();
        imageList.Images.AddStrip(
            new Bitmap(GetType(), "Project1.menuicon.png"));
        imageList.TransparentColor = Color.Magenta;
        //
        // tsmiNew
        //
        ToolStripMenuItem tsmiNew = new ToolStripMenuItem("新規(&N)");
        tsmiNew.Click += new EventHandler(tsmiNew_Click);
        tsmiNew.Image = imageList.Images[0];
        //
        // tsmiExit
        //
        ToolStripMenuItem tsmiExit = new ToolStripMenuItem("終了(&X)");
        tsmiExit.Click += new EventHandler(tsmiExit_Click);
        tsmiExit.Image = imageList.Images[1];
        //
        // tsmiFile
        //
        ToolStripMenuItem tsmiFile = new ToolStripMenuItem("ファイル(&F)");
        tsmiFile.DropDownItems.AddRange(new ToolStripItem[]
        {
            tsmiNew, new ToolStripSeparator(), tsmiExit
        });
        //
        // menuStrip
        //
        menuStrip = new MenuStrip();
        menuStrip.Items.AddRange(new ToolStripItem[]
        {
            tsmiFile
        });
        //
        // Form1
        //
        this.Controls.Add(menuStrip);
        this.MainMenuStrip = menuStrip;
    }

    void tsmiNew_Click(object sender, EventArgs e)
    {
        new Form1().Show();
    }

    void tsmiExit_Click(object sender, EventArgs e)
    {
        this.Close();
    }
}
解説
メニュー項目にアイコンを付けるには,Image プロパティを設定します。
アイコン用のイメージファイルは,もちろん 1 個ずつ用意しても構いません。
今回紹介する ImageList クラスを利用して,複数のアイコンをまとめたファイルを 1 つ用意する方法でも構いません。
いずれにせよ,イメージはリソースとしてプログラムに埋め込んでください。
リソースの埋め込みについては 7.1 節 を参照してください。
アイコン用のイメージファイルとしては,次のような短冊状のイメージファイルを用意して,ImageList で処理するのが便利です。
このイメージは,16 x 16 のアイコンを一列に繋げ,背景はマゼンタ (R, G, B) = (0xff, 0, 0xff) に塗り潰してあります。

ImageList クラスは,次のような機能を提供します。
- 短冊状のイメージから複数のアイコンを自動生成 (Images.AddStrip から登録した場合)
- 透過色を指定 (TransparentColor プロパティ)
ImageList の Images プロパティがコレクションになっていて,インデクサで個々のアイコンにアクセスできます。
ImageList.ImageCollection は List<Image> と同じ働きのものだと思ってください。
System.Windows.Forms 名前空間
ImageList クラス
[MSDN]
イメージ リストを管理します。
プロパティ
| 項目 | 説明 |
|---|---|
| Color TransparentColor | 透過色 |
| ImageList.ImageCollection Images | イメージのコレクション |
Images.AddStrip メソッド
短冊状のイメージを追加します。
int AddStrip (
    Image value
)
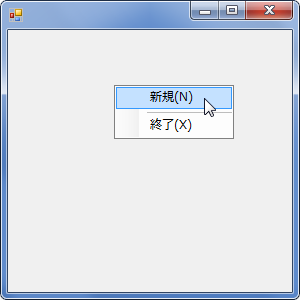
コンテキストメニュー
作例:コンテキストメニュー (ツールストリップ版)
コード
using System;
using System.Drawing;
using System.Windows.Forms;

class Program
{
    [STAThread]
    static void Main()
    {
        Application.EnableVisualStyles();
        Application.Run(new Form1());
    }
}

class Form1 : Form
{
    ContextMenuStrip contextMenuStrip = new ContextMenuStrip();

    public Form1()
    {
        //
        // tsmiNew
        //
        ToolStripMenuItem tsmiNew = new ToolStripMenuItem("新規(&N)");
        tsmiNew.Click += new EventHandler(tsmiNew_Click);
        //
        // tsmiExit
        //
        ToolStripMenuItem tsmiExit = new ToolStripMenuItem("終了(&X)");
        tsmiExit.Click += new EventHandler(tsmiExit_Click);
        //
        // contextMenuStrip
        //
        contextMenuStrip.Items.AddRange(new ToolStripItem[] {
            tsmiNew, new ToolStripSeparator(), tsmiExit });
        //
        // Form1
        //
        this.ContextMenuStrip = contextMenuStrip;
    }

    void tsmiNew_Click(object sender, EventArgs e)
    {
        new Form1().Show();
    }

    void tsmiExit_Click(object sender, EventArgs e)
    {
        this.Close();
    }
}
解説: コンテキストメニュー (ツールストリップ版)
コンテキストメニューの作り方はメインメニューとほとんど同じで,メニュー項目に ToolStripMenuItem を使います。
MenuStrip クラスは使わず,代わりに ContextMenuStrip を使います。
ContextMenuStrip をフォームの ContextMenuStrip プロパティに設定して,コンテキストメニューを設置します。
ContextMenuStrip は MenuStrip の場合と異なり,Controls.Add メソッドでフォームに追加しません。
System.Windows.Forms 名前空間
ContextMenuStrip クラス
[MSDN]
コンテキストメニューを表現します。
メソッド
| 項目 | 説明 |
|---|---|
| Items.Add | メニュー項目の追加 |
| Items.AddRange | 複数のメニュー項目の追加 |
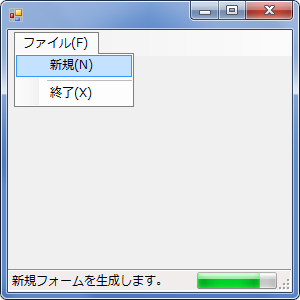
ステータスバー
作例:ステータスバー (ツールストリップ版)
プログレスバーはダミーです。
コード
using System;
using System.Drawing;
using System.Windows.Forms;

class Program
{
    [STAThread]
    static void Main()
    {
        Application.EnableVisualStyles();
        Application.Run(new Form1());
    }
}
class Form1 : Form
{
    MenuStrip menuStrip;
    StatusStrip statusStrip;
    ToolStripStatusLabel toolStripStatusLabel;
    ToolStripProgressBar toolStripProgressBar;

    public Form1()
    {
        //
        // tsmiNew
        //
        ToolStripMenuItem tsmiNew = new ToolStripMenuItem("新規(&N)");
        tsmiNew.Click += new EventHandler(tsmiNew_Click);
        tsmiNew.MouseEnter += new EventHandler(tsmi_MouseEnter);
        tsmiNew.MouseLeave += new EventHandler(tsmi_MouseLeave);
        //
        // tsmiExit
        //
        ToolStripMenuItem tsmiExit = new ToolStripMenuItem("終了(&X)");
        tsmiExit.Click += new EventHandler(tsmiExit_Click);
        tsmiExit.MouseEnter += new EventHandler(tsmi_MouseEnter);
        tsmiExit.MouseLeave += new EventHandler(tsmi_MouseLeave);
        //
        // tsmiFile
        //
        ToolStripMenuItem tsmiFile = new ToolStripMenuItem("ファイル(&F)");
        tsmiFile.DropDownItems.AddRange(new ToolStripItem[]
        {
            tsmiNew, new ToolStripSeparator(), tsmiExit
        });
        //
        // menuStrip
        //
        menuStrip = new MenuStrip();
        menuStrip.Items.AddRange(new ToolStripItem[]
        {
            tsmiFile
        });
        //
        // toolStripStatusLabel
        //
        toolStripStatusLabel = new ToolStripStatusLabel();
        //
        // toolStripProgressBar
        //
        toolStripProgressBar = new ToolStripProgressBar()
        {
            Alignment = ToolStripItemAlignment.Right,
            Value = 80,
            Size = new Size(80, 16),
        };
        //
        // statusStrip
        //
        statusStrip = new StatusStrip()
        {
            statusStrip.Dock = DockStyle.Bottom,
            statusStrip.LayoutStyle = ToolStripLayoutStyle.StackWithOverflow,
        };
        statusStrip.Items.AddRange(new ToolStripItem[]
        {
            toolStripStatusLabel, toolStripProgressBar
        });
        //
        // Form1
        //
        this.Controls.AddRange(new Control[]
        {
            menuStrip, statusStrip
        });
        this.MainMenuStrip = menuStrip;
    }

    void tsmiNew_Click(object sender, EventArgs e)
    {
        new Form1().Show();
    }

    void tsmiExit_Click(object sender, EventArgs e)
    {
        this.Close();
    }

    void tsmi_MouseEnter(object sender, EventArgs e)
    {
        switch (sender.ToString())
        {
            case "新規(&N)":
                toolStripStatusLabel.Text = "新規フォームを生成します。";
                break;
            case "終了(&X)":
                toolStripStatusLabel.Text = "現在のフォームを終了します。";
                break;
        }
    }

    void tsmi_MouseLeave(object sender, EventArgs e)
    {
        toolStripStatusLabel.Text = "";
    }
}
解説
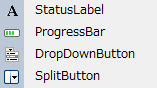
StatusStrip の上に ToolStripStatusLabel と ToolStripProgressBar を載っけています。
この他に,ToolStripDropDownButton や ToolStripSplitButton を載せることもできます。
System.Windows.Forms 名前空間
StatusStrip クラス
[MSDN]
ステータスバーを表現します。
プロパティ
| 項目 | 説明 |
|---|---|
| ToolStripLayoutStyle LayoutStyle | 配置スタイル |
メソッド
| 項目 | 説明 |
|---|---|
| Items.Add | 項目の追加 |
| Items.AddRange | 複数の項目の追加 |
System.Windows.Forms 名前空間
ToolStripLayoutStyle 列挙体
[MSDN]
ステータスバーの配置スタイルを表現します。
enum ToolStripLayoutStyle
{
    StackWwithOverflow = 0,
    HorizontalStackWithOverflow = 1,
    VerticalStackWithOverflow = 2,
    Flow = 3,
    Table = 4,
}
System.Windows.Forms 名前空間
ToolStripStatusLabel クラス
[MSDN]
ステータスバー上のラベルを表現します。
プロパティ
| 項目 | 説明 |
|---|---|
| ToolStripItemAlignment Alignment | 配置 |
System.Windows.Forms 名前空間
ToolStripProgressBar クラス
[MSDN]
ステータスバー上のプログレスバーを表現します。
プロパティ
| 項目 | 説明 |
|---|---|
| ToolStripItemAlignment Alignment | 配置 |
| int Value | 値 |
System.Windows.Forms 名前空間
ToolStripItemAlignment 列挙体
[MSDN]
ツールストリップアイテムの配置を表現します。
enum ToolStripItemAlignment
{
    Left = 0,
    Right = 1,
}
コード
using System;
using System.Drawing;
using System.Windows.Forms;

class Program
{
    [STAThread]
    static void Main()
    {
        Application.EnableVisualStyles();
        Application.Run(new Form1());
    }
}
class Form1 : Form
{
    ToolStrip toolStrip;

    public Form1()
    {
        //
        // imageList
        //
        ImageList imageList = new ImageList();
        imageList.Images.AddStrip(
            new Bitmap(GetType(), "Project1.toolicon.png"));
        imageList.TransparentColor = Color.Magenta;
        //
        // tsbNew
        //
        ToolStripButton tsbNew = new ToolStripButton()
        {
            ToolTipText = "新規",
            ImageIndex = 0,
        };
        //
        // tsbExit
        //
        ToolStripButton tsbExit = new ToolStripButton()
        {
            ToolTipText = "終了",
            ImageIndex = 1,
        };
        //
        // toolStrip
        //
        toolStrip = new ToolStrip();
        toolStrip.Items.AddRange(new ToolStripItem[]
        {
            tsbNew, tsbExit
        });
        toolStrip.ImageList = imageList;
        toolStrip.ItemClicked +=
            new ToolStripItemClickedEventHandler(toolStrip_ItemClicked);
        //
        // Form1
        //
        this.Controls.Add(toolStrip);
    }

    void toolStrip_ItemClicked(
        object sender, ToolStripItemClickedEventArgs e)
    {
        switch (e.ClickedItem.ToolTipText)
        {
            case "新規":
                new Form1().Show();
                break;
            case "終了":
                this.Close();
                break;
        }
    }
}
解説
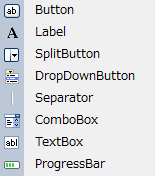
ToolStrip 上には,ToolStripButton の他に ToolStripLabel なども貼り付けられます。
この図に示したアイテムが,それぞれ頭に ToolStrip を付けた名前で利用できます。
System.Windows.Forms 名前空間
ToolStrip クラス
[MSDN]
ツールバーを表現します。
イベント
| 項目 | 説明 |
|---|---|
| eToolStripItemClickedEventHandler ItemClicked | 項目のクリック |
メソッド
| 項目 | 説明 |
|---|---|
| Controls.Add | 項目の追加 |
| Controls.AddRange | 複数の項目の追加 |
System.Windows.Forms 名前空間
ToolStripButton クラス
[MSDN]
ツールバー上のボタンを表現します。
プロパティ
| 項目 | 説明 |
|---|---|
| string Text | テキスト |
| string ToolTipText | ツールチップ |
| int ImageIndex | イメージのインデックス |
System.Windows.Forms 名前空間
delegate void ToolStripItemClickedEventHandler(
    object sender, ToolStripItemClickedEventArgs e);
System.Windows.Forms 名前空間
ToolStripItemClickedEventArgs クラス
[MSDN]
ツールストリップ項目のクリックイベントに関するデータを提供します。
プロパティ
| 項目 | 説明 |
|---|---|
| ToolStripItem ClickedItem | クリックされた項目 |